Simplified Laravel 9 REST API Tutorial using Sanctum Authentication
Last Updated: 30 Dec, 2022In this simplified tutorial, you will learn the simplest way to create a REST API application in Laravel 9 that will be authenticated using Laravel Sanctum. To do this, we will use laravel/sanctum composer package that will helps us to solve two types of problems:
API Tokens:
Laravel Sanctum is a simple and very usefue composer package that allows us to issue API tokens to our end users without having the complexity of OAuth. Laravel Sanctum provides us this feature by storing our end user API tokens in a single database table and helps us to authenticate incoming HTTP requests through the Authorization header that should contain a valid API token.
SPA Authentication:
Laravel Sanctum provides us a very simple medium to authenticate Single Page Applications (SPAs) that communicates with a Laravel powered REST API. For this purpose, Sanctum does not any tokens. It uses Laravel's built-in cookie based session authentication services instead.
How to Create Rest API Authentication using Sanctum in Laravel 9?
Let's follow below step-by-step process to implement REST API authentication based on Laravel Sanctum:
Step 1: Create New Laravel 9 Application
First of all, let's create a fresh laravel 9 application named l9restsanctum. Open terminal and run the below command:
composer create-project laravel/laravel l9restsanctum
Step 2: Configure Database Connection
Next, let's open .env file and update following configuration variables:
DB_DATABASE=l9restsanctum
DB_USERNAME={yourdbusername}
DB_PASSWORD={yourdbpassword}
Step 3: Install and Configure Laravel Sanctum Composer Package
Next, install laravel/sanctum laravel package that will help us to authenticate the apis of our application. Latest laravel version comes with Sanctum package is installed along wiht itl. But you can also install it manually by running below command in your terminal:
composer require laravel/sanctum
Once you have successfully install laravel/sanctum package, publish its configuration by running below command:
php artisan vendor:publish --provider="Laravel\Sanctum\SanctumServiceProvider"
Next, if you want Sanctum to authenticate a Single Page Application, you must enable Sanctum's middleware to your api middleware group within your application's app/Http/Kernel.php as below:
'api' => [
    \Laravel\Sanctum\Http\Middleware\EnsureFrontendRequestsAreStateful::class,
    'throttle:api',
    \Illuminate\Routing\Middleware\SubstituteBindings::class,
],
Step 4: Make important Changes to User Model
Next, we need to modify User model. Fresh laravel installation comes with a pre-defined User model that is helpful for authentication purpose. Open App\Models\User.php and copy below given code in it:
<?php
namespace App\Models;
use Illuminate\Contracts\Auth\MustVerifyEmail;
use Illuminate\Database\Eloquent\Factories\HasFactory;
use Illuminate\Foundation\Auth\User as Authenticatable;
use Illuminate\Notifications\Notifiable;
use Laravel\Sanctum\HasApiTokens;

class User extends Authenticatable
{
    use HasApiTokens, HasFactory, Notifiable;
    protected $fillable = [
        'name',
        'email',
        'password',
    ];
    protected $hidden = [
        'password',
        'remember_token',
    ];
    protected $casts = [
        'email_verified_at' => 'datetime',
    ];
}
Step 5: Create a Contact Model and migration
Next, we have to create Contact model and migration using below command:
php artisan make:model Contact -m
Above command will create a model file named Contact.php and a migration file named database/migrations/*_create_contacts_table.php. Open the migration file and copy below code in it:
<?php
use Illuminate\Database\Migrations\Migration;
use Illuminate\Database\Schema\Blueprint;
use Illuminate\Support\Facades\Schema;

return new class extends Migration
{
    public function up()
    {
        Schema::create('contacts', function (Blueprint $table) {
            $table->id();
            $table->string('name');
            $table->string('email');
            $table->string('phone');
            $table->timestamps();
        });
    }
    public function down()
    {
        Schema::dropIfExists('contacts');
    }
};
Next, we have to mention mandatory fields in the Contact model. Open app/Models/Contact.php file and copy below code in this:
<?php
namespace App\Models;
use Illuminate\Database\Eloquent\Factories\HasFactory;
use Illuminate\Database\Eloquent\Model;

class Contact extends Model
{
    use HasFactory;
    protected $fillable = [
        'name',
        'email',
        'phone',
    ];
}
Once you have updated model and migration files, run the below command to create the tables in MySQL DB:
php artisan migrate
Step 6: Create a Controller named AuthenticationController
In this step, let's create AuthenticationController under app/Http/Controllers/Api directory by running below command in terminal:
php artisan make:controller Api/AuthenticationController
Next, open the app/Http/Controllers/AuthenticationController.php and copy below code in it:
<?php
namespace App\Http\Controllers\Api;

use App\Http\Controllers\Controller;
use Illuminate\Http\Request;
use Illuminate\Support\Facades\Auth;
use Validator;
use App\Models\User;

class AuthenticationController extends Controller
{
    public function register(Request $request)
    {
        $validator = Validator::make($request->all(), [
            'name' => 'required|string|min:3|max:50',
            'email' => 'required|string|email|max:100|unique:users',
            'password' => 'required|string|confirmed|min:8',
        ]);

        if ($validator->fails()) {
            return response()->json([
                'status' => false,
                'message' => 'Invalid Inputs',
                'error' => $validator->errors()
            ], 401);
        }

        $user = new User();
        $user->name = $request->name;
        $user->email = $request->email;
        $user->password = bcrypt($request->password);
        $user->save();

        $token = $user->createToken('L9SanctumAppToken')->plainTextToken;

        return response()->json([
            'status' => true,
            'message' => 'User successfully registered',
            'user' => $user,
            'token' => $token
        ], 201);
    }

    public function login(Request $request)
    {
        $validator = Validator::make($request->all(), [
            'email' => 'required|email',
            'password' => 'required|string|min:8'
        ]);

        if ($validator->fails()) {
            return response()->json([
                'status' => false,
                'message' => 'Invalid Inputs',
                'error' => $validator->errors()
            ], 422);
        }

        if (Auth::attempt(['email'=>$request->email, 'password'=>$request->password])) {
            $user = Auth::user();
            $token = $user->createToken('MyAppToken')->plainTextToken;
            $timestamp = now()->addMinute(2880);
            $expires_at = date('M d, Y H:i A', strtotime($timestamp));
            return response()->json([
                'status' => true,
                'message' => 'Login successful',
                'access_token' => $token,
                'token_type' => 'bearer',
                'expires_at' => $expires_at
            ], 200);
        } else {
            return response()->json([
                'status' => false,
                'message' => 'Invalid Credentials',
            ], 400);
        }
    }
}
Step 7: Create a Controller named ContactsController
In this step, let's create ContactsController under app/Http/Controllers/Api directory by running below command in terminal:
php artisan make:controller Api/ContactsController
Open newly created app/Http/Controllers/Api/ContactsController.php and copy following code in it:
<?php
namespace App\Http\Controllers\Api;

use App\Http\Controllers\Controller;
use Illuminate\Http\Request;
use Illuminate\Support\Facades\DB;
use Validator;
use App\Models\Contact;

class ContactsController extends Controller
{
    public function index()
    {
        $contacts = Contact::all();
        return response()->json([
            "status" => true,
            "message" => "List of Contacts",
            "data" => $contacts
        ]);
    }

    public function store(Request $request)
    {
        $posted_data = $request->all();
        $validator = Validator::make($posted_data, [
            'name' => 'required',
            'email' => 'required',
            'phone' => 'required'
        ]);

        if ($validator->fails()) {
            return response()->json([
                'status' => false,
                'message' => 'Invalid Inputs',
                'error' => $validator->errors()
            ]);
        }

        $contact = Contact::create($posted_data);
        return response()->json([
            "status" => true,
            "message" => "Contact added successfully.",
            "data" => $contact
        ]);
    }

    public function show(Contact $contact)
    {
        if (is_null($contact)) {
            return response()->json([
                'status' => false,
                'message' => 'Contact not found'
            ]);
        } else {
            return response()->json([
                "success" => true,
                "message" => "Contact found.",
                "data" => $contact
            ]);
        }
    }

    public function update(Request $request, Contact $contact)
    {
        $posted_data = $request->all();
        $validator = Validator::make($posted_data, [
            'name' => 'required',
            'email' => 'required',
            'phone' => 'required'
        ]);

        if($validator->fails()){
            return response()->json([
                'status' => false,
                'message' => 'Invalid Inputs',
                'error' => $validator->errors()
            ]);
        }

        $contact->name = $posted_data['name'];
        $contact->email = $posted_data['email'];
        $contact->phone = $posted_data['phone'];
        $contact->save();
        return response()->json([
            "status" => true,
            "message" => "Contact modified successfully.",
            "data" => $contact
        ]);
    }

    public function destroy(Contact $contact)
    {
        $contact->delete();
        return response()->json([
            "status" => true,
            "message" => "Contact removed successfully.",
            "data" => $contact
        ]);
    }
}
Step 8: Add Authentication and Contacts API Routes
Now, let's create routes for the apis. API routes are stored in routes/api.php file and served to laravel application. API routes are prfixed with api/ and authentication routes are denoted by auth/. We will be creating a resource route for CRUD operation on Contact table.
So, let's open the routes/api.php and update it as follows:
<?php
use Illuminate\Http\Request;
use Illuminate\Support\Facades\Route;
Route::group(['namespace'=>'App\Http\Controllers\Api'], function(){
    Route::group(['prefix'=>'auth'], function () {
        Route::post('register', 'AuthenticationController@register');
        Route::post('login', 'AuthenticationController@login');
    });
    Route::group(['middleware'=>['auth:sanctum']], function () {
        Route::resource('contacts', ContactsController::class);
    });
});
Step 9: Run Laravel Development Server
Let's start the application development server now by using below command in terminal:
php artisan serve
Step 10: Test Application with Postman
Once development server is started, you can test your application with postman. Now, in this step we will use the postman to test our application. Open postman and test the APIs one-by-one.
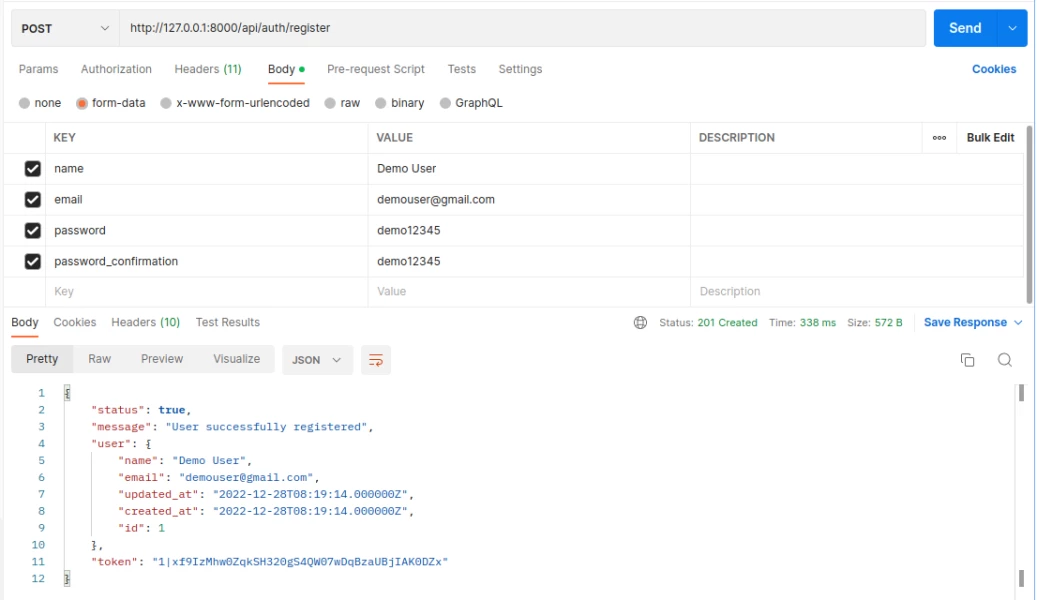
Registration API
First of all, let's register a new user usinghttp://127.0.0.1:8000/api/auth/register API POST request.In the body section, select form-data and required parameters (name, email, password, password_confirmation) and click on Send button in postman. Below attached screenshot will help you:
Login API
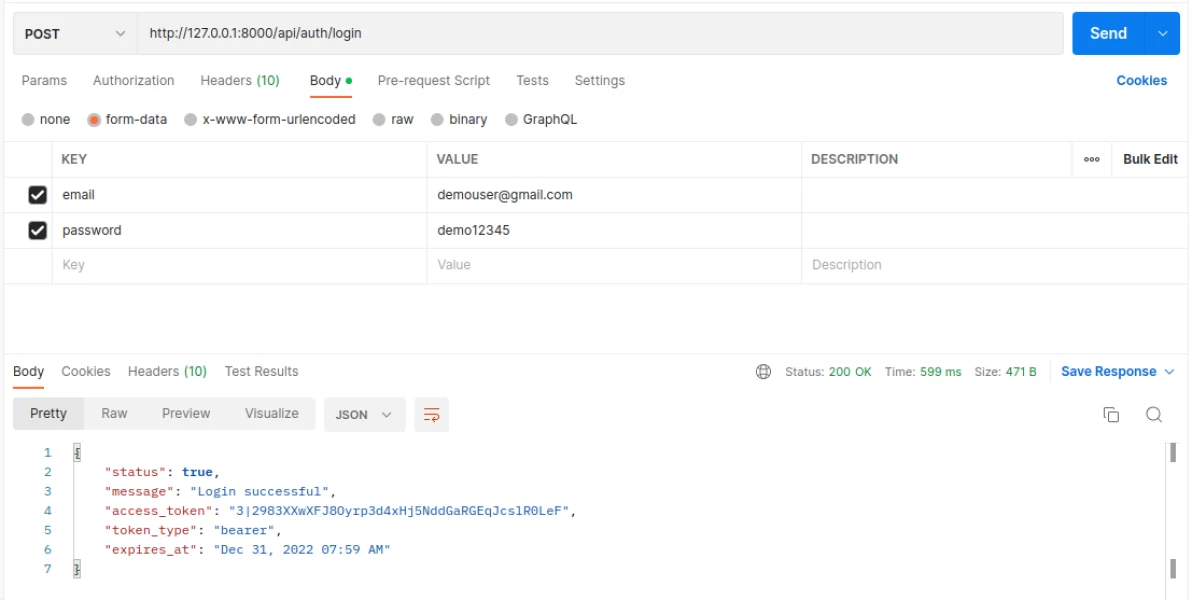
Next, test the User Login by calling the http://127.0.0.1:8000/api/auth/login API POST request Fill in required parameters (email and password) under form-data in request body. If successful, API will return an access token along with token type, token expiration time, etc. Please refer the below screenshot:
CRUD APIs on Contacts Table
Once the API Access Token is obtained, you can perform CRUD API operation by passing the access token in request header as a field 'Authorization: Bearer Token'.
Contact Create API
Make http://127.0.0.1:8000/api/contacts POST API request to create new contact. Please refer the below attached screenshot:

Contacts List API
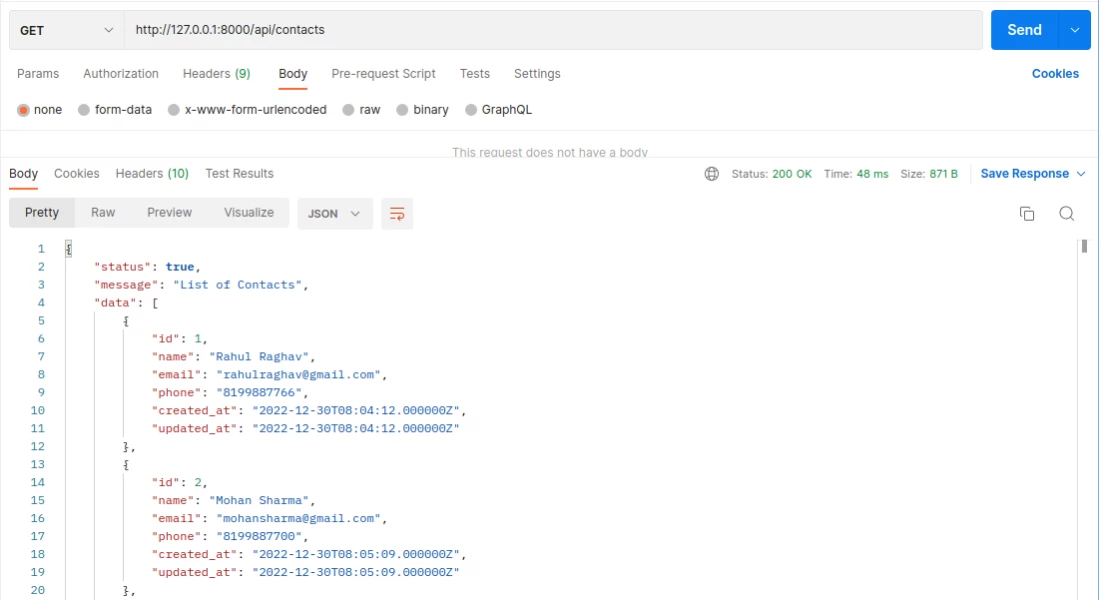
Next, get the contacts by making http://127.0.0.1:8000/api/contacts GET API call. Please refer the below attached screenshot:
Contact Update API
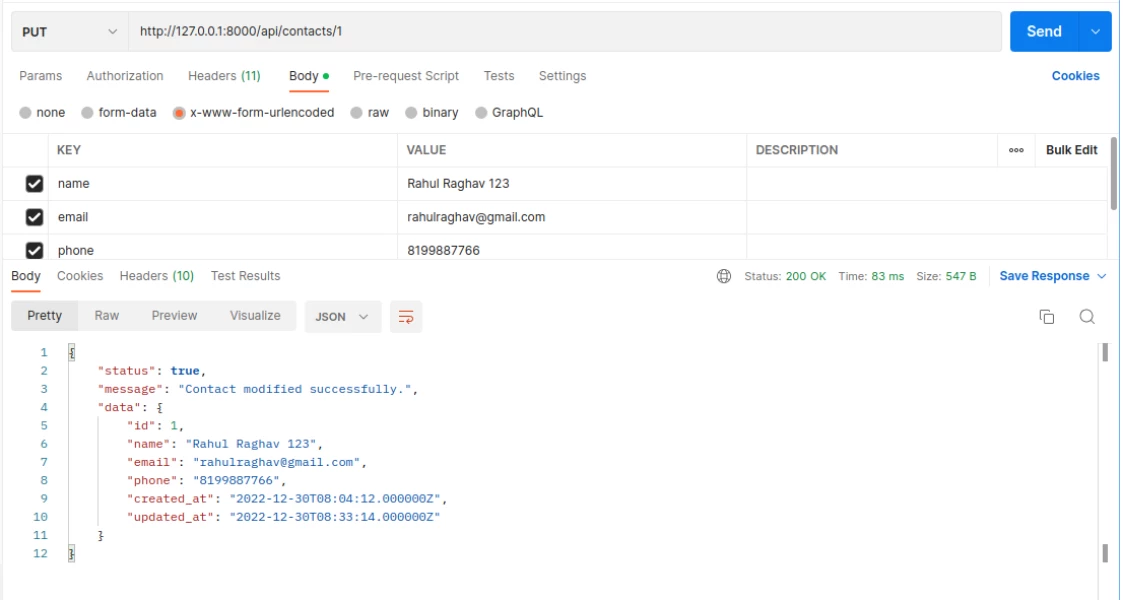
Next, update the contact by calling http://127.0.0.1:8000/api/contacts PUT API. Please refer the below screenshot:
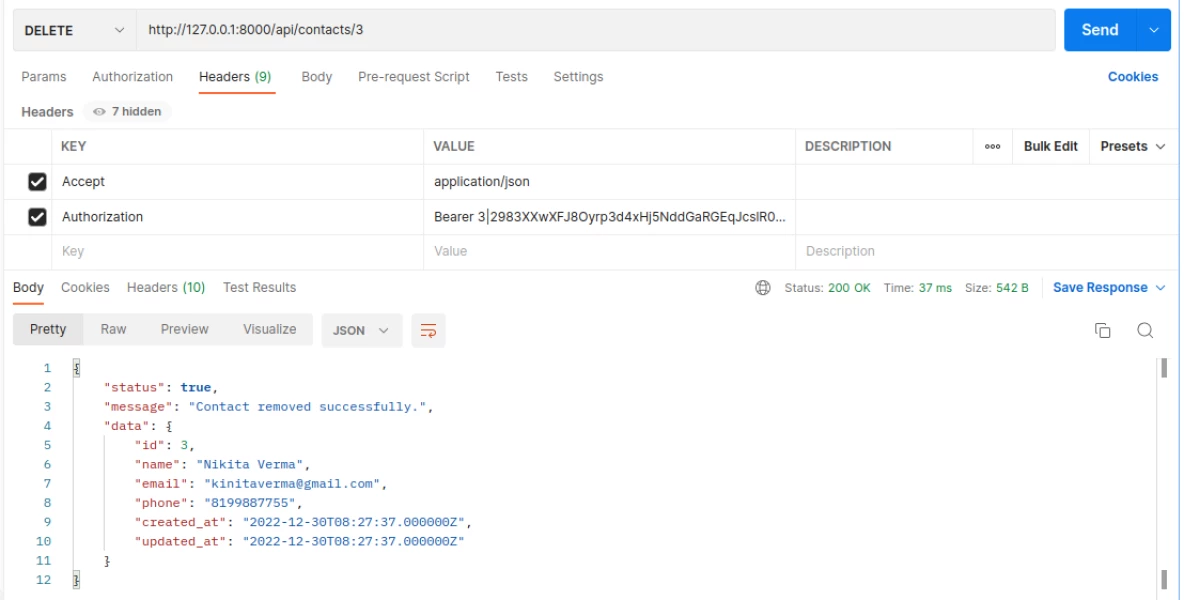
Contact Delete API
Next, delete a contact by making http://127.0.0.1:8000/api/contacts DELETE API request. Please refer the below screenshot:
Recommended Posts
Simplified Laravel 9 REST API Tutorial using JWT Authentication
In this comprehensive tutorial, you will easily learn step-by-step process of how to authenticate REST API application in Laravel 9 using JSON Web Token.
Simplified Laravel 9 REST API Tutorial using Passport Authentication
In this simple tutorial, you will learn all the step-by-step process of authenticating Laravel 9 REST API application using Laravel Passport.
Simplified Laravel 9 Cashfree Integration Tutorial for Beginners
In this awesome tutorial, we are going to learn the simplest way of integrating Cashfree Payment Gateway inside Laravel 9 application.