Simplified Laravel 9 REST API Tutorial using Passport Authentication
Last Updated: 30 Jan, 2023In this simplified tutorial, you are going to learn the simplest and easy way to create a CRUD REST API laravel 9 application that will be using Laravel Passport for authentication. We will achieve this by using laravel/passport package.
What is Laravel Passport?
Laravel Passport offers us a full OAuth2 server implementation for our Laravel applications in a very comprehensive way. Passport has been built on the top of the League OAuth2 server.
How to Build a Restful API using Passport in Laravel 9?
Follow the below mentioned step-by-step guidance to learn how to create REST APIs with Passport in laravel 9 application from scratch:
Step 1: Setup a New Laravel 9 Application
First of all, let's install a fresh laravel 9 application. Let's open terminal and execute below given command:
composer create-project laravel/laravel l9restpassport
Step 2: Setup Database Configuration
Next, lets update database configuration in .env file as follows:
DB_DATABASE=l9restpassport
DB_USERNAME={your_db_username}
DB_PASSWORD={your_db_password}
Step 3: Install and Configure Passport Authentication Package
Next, install laravel/passport package through composer to authenticate the apis. To install it, run below command in terminal:
composer require laravel/passport
Once you have successfully install the package, run below command to migrate the passport table in to the database:
php artisan migrate
Next, we need to generate a paasport token keys using below command to provide security to your application:
php artisan passport:install
Next, open app/Providers/AuthServiceProvider.php file and register the registerPolicies() method inside the boot() function, It will evoke the required routes. Copy and paste below code in it:
<?php
namespace App\Providers;
use Illuminate\Support\Facades\Gate;
use Illuminate\Foundation\Support\Providers\AuthServiceProvider as ServiceProvider;

class AuthServiceProvider extends ServiceProvider
{
    protected $policies = [
        'App\Models\Model' => 'App\Policies\ModelPolicy',
    ];

    public function boot()
    {
        $this->registerPolicies();
    }
}
Next, register the PassportServiceProvider class in providers array inside the config/app.php file:
'providers' => [
    ...
    ...
    ...
    /*
     * Package Service Providers...
     */
    Laravel\Passport\PassportServiceProvider::class,
],
Next, we need to configure driver for the passport. Open config/auth.php file and the changes as follows:
'guards' => [
    'web' => [
        'driver' => 'session',
        'provider' => 'users',
    ],
    'api' => [
        'driver' => 'passport',
        'provider' => 'users',
    ],
],
Step 4: Set Up User Model
Next, open App\Models\User.php and copy below code in it:
<?php
namespace App\Models;
use Illuminate\Contracts\Auth\MustVerifyEmail;
use Illuminate\Database\Eloquent\Factories\HasFactory;
use Illuminate\Foundation\Auth\User as Authenticatable;
use Illuminate\Notifications\Notifiable;
use Laravel\Passport\HasApiTokens;

class User extends Authenticatable
{
    use HasApiTokens, HasFactory, Notifiable;

    protected $fillable = [
        'name',
        'email',
        'password',
    ];

    protected $hidden = [
        'password',
        'remember_token',
    ];

    protected $casts = [
        'email_verified_at' => 'datetime',
    ];
}
Step 5: Create Continent Model and migration
Next, let's create a Continent model and a migration files using below command:
php artisan make:model Continent -m
This command will generate a model file called App\Models\Continent.php and a migration file named database/migrations/*_create_continents_table.php. Open the migration file and copy below code in it:
<?php
use Illuminate\Database\Migrations\Migration;
use Illuminate\Database\Schema\Blueprint;
use Illuminate\Support\Facades\Schema;

return new class extends Migration
{
    public function up()
    {
        Schema::create('continents', function (Blueprint $table) {
            $table->id();
            $table->string('name');
            $table->string('countries');
            $table->string('population');
            $table->timestamps();
        });
    }

    public function down()
    {
        Schema::dropIfExists('continents');
    }
};
Next, let's open App\Models\Continent.php file and copy below given code in it:
<?php
namespace App\Models;
use Illuminate\Database\Eloquent\Factories\HasFactory;
use Illuminate\Database\Eloquent\Model;
class Continent extends Model
{
    use HasFactory;
    protected $fillable = [
        'name',
        'countries',
        'population'
    ];
}
Next, let's run the below command to run laravel migration that will create the tables in MySQL DB:
php artisan migrate
Step 6: Create and Setup Authentication Controller
In this step, let's create AuthenticationController and define neccessary functions and logics. Run below given command in terminal that will create app/Http/Controllers/Api/AuthenticationController.php file.
php artisan make:controller Api/AuthenticationController
Open the app/Http/Controllers/Api/AuthenticationController.php and copy below code in it:
<?php
namespace App\Http\Controllers\Api;
use App\Http\Controllers\Controller;
use Illuminate\Http\Request;
use Illuminate\Support\Facades\Auth;
use Validator;
use App\Models\User;

class AuthenticationController extends Controller
{
    public function register(Request $request)
    {
        $validator = Validator::make($request->all(), [
            'name' => 'required|string|min:3|max:20',
            'email' => 'required|string|email|max:40|unique:users',
            'password' => 'required|string|confirmed|min:6',
        ]);

        if ($validator->fails()) {
            return response()->json([
                'status' => false,
                'message' => 'Invalid Inputs',
                'error' => $validator->errors()
            ], 401);
        }

        $user = new User();
        $user->name = $request->name;
        $user->email = $request->email;
        $user->password = bcrypt($request->password);
        $user->save();

        return response()->json([
            'status' => true,
            'message' => 'Registeration successful',
            'user' => $user
        ], 201);
    }

    public function login(Request $request)
    {
        $validator = Validator::make($request->all(), [
            'email' => 'required|email',
            'password' => 'required|string|min:6'
        ]);

        if ($validator->fails()) {
            return response()->json([
                'status' => false,
                'message' => 'Invalid Inputs',
                'error' => $validator->errors()
            ], 422);
        }

        if (Auth::attempt(['email'=>$request->email, 'password'=>$request->password])) {
            $user = Auth::user();
            $token = $user->createToken('Laravel9PassportAppToken')->accessToken;
            $expires_at = date('m-d-Y H:i:s', strtotime(now()->addMinute(1000)));
            return response()->json([
                'status' => true,
                'message' => 'Login successful',
                'access_token' => $token,
                'token_type' => 'bearer',
                'expires_at' => $expires_at
            ], 200);
        } else {
            return response()->json([
                'status' => false,
                'message' => 'Invalid Credentials',
            ], 400);
        }
    }
}
Step 7: Create ContinentController
Next, we have to create ContinentController by running below command in terminal that will generate app/Http/Controllers/Api/ContinentController.php file.
php artisan make:controller Api/ContinentController
Let's open app/Http/Controllers/Api/ContinentController.php and copy below provided code inside it:
<?php
namespace App\Http\Controllers\Api;
use App\Http\Controllers\Controller;
use Illuminate\Http\Request;
use Illuminate\Support\Facades\DB;
use Validator;
use App\Models\Continent;

class ContinentController extends Controller
{
    public function index()
    {
        $continents = Continent::all();
        return response()->json([
            "status" => true,
            "message" => "List of Continents",
            "data" => $continents
        ]);
    }

    public function store(Request $request)
    {
        $request_data = $request->all();
        $validator = Validator::make($request_data, [
            'name' => 'required',
            'countries' => 'required',
            'population' => 'required'
        ]);
        if ($validator->fails()) {
            return response()->json([
                'status' => false,
                'message' => 'Invalid Inputs',
                'error' => $validator->errors()
            ]);
        }
        $continent = Continent::create($request_data);
        return response()->json([
            "status" => true,
            "message" => "Continent created successfully.",
            "data" => $continent
        ]);
    }

    public function show(Continent $continent)
    {
        if (is_null($continent)) {
            return response()->json([
                'status' => false,
                'message' => 'Continent not found'
            ]);
        }
        return response()->json([
            "success" => true,
            "message" => "Continent found.",
            "data" => $continent
        ]);
    }

    public function update(Request $request, Continent $continent)
    {
        $request_data = $request->all();
        $validator = Validator::make($request_data, [
            'name' => 'required',
            'countries' => 'required',
            'population' => 'required'
        ]);
        if($validator->fails()){
            return response()->json([
                'status' => false,
                'message' => 'Invalid Inputs',
                'error' => $validator->errors()
            ]);
        }
        $continent->name = $request_data['name'];
        $continent->countries = $request_data['countries'];
        $continent->population = $request_data['population'];
        $continent->save();
        return response()->json([
            "status" => true,
            "message" => "Continent updated successfully.",
            "data" => $continent
        ]);
    }

    public function destroy(Continent $continent)
    {
        $continent->delete();
        return response()->json([
            "status" => true,
            "message" => "Continent deleted successfully.",
            "data" => $continent
        ]);
    }
}
Step 8: Create REST APIs Routes
In this step, we will be creating routes for our rest apis. API routes are stored inside routes/api.php file and served through it. These routes are prfixed with api/ and auth routes are denoted by auth/. We will be creating a resource route for CRUD operation on Continent table.
So, let's open routes/api.php and copy below given code inside it:
<?php
use Illuminate\Http\Request;
use Illuminate\Support\Facades\Route;
use App\Http\Controllers\Api\AuthenticationController;
use App\Http\Controllers\Api\ContinentController;

Route::prefix('auth')->controller(AuthenticationController::class)->group(function () {
    Route::post('register', 'register');
    Route::post('login', 'login');
});
Route::middleware('auth:api')->group(function () {
    Route::resource('continents', ContinentController::class);
});
Step 9: Start Laravel Development Server
Great, we are all set. Lets start the application development server now by using below command in terminal:
php artisan serve
Once development server is started, you can test your application with postman.
Step 10: Testing REST APIs using Postman
Now, in this step we will use the postman to test our application. Open postman app and in Headers tab, define "Accept": application/json header value. Next, you are ready to go and test the APIs one-by-one.
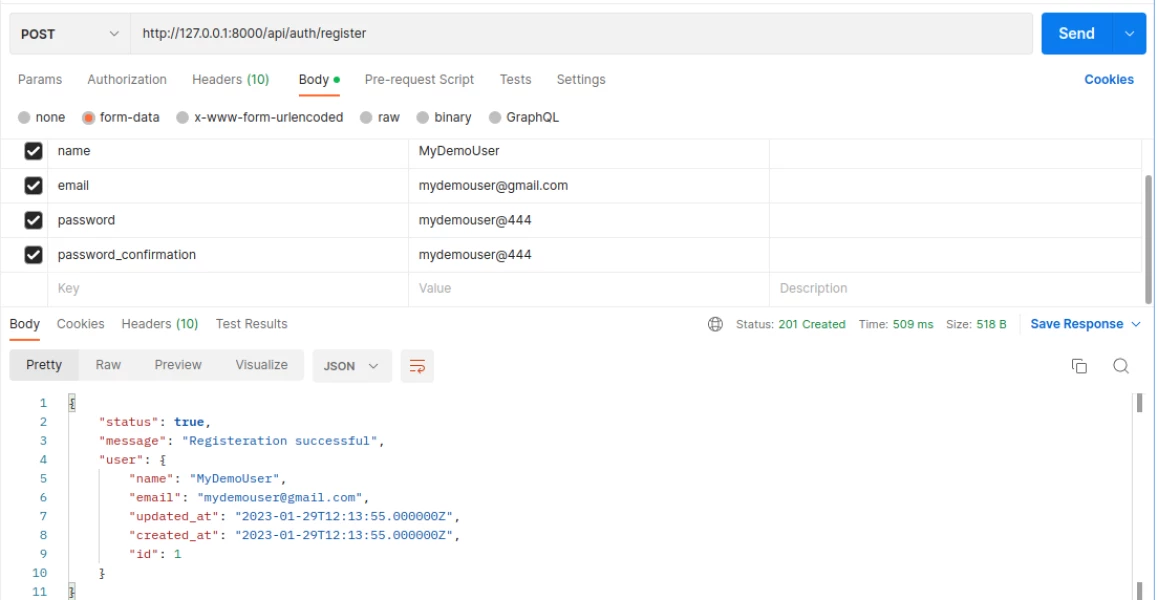
User Registration API
First of all, register a new user using /api/auth/register API. You have to select POST as request method and in the request body select form-data and fill in all the required parameters like name, email, password, etc. Then call the api by clicking on Send button in postman. Please refer the below attached screenshot:
User Login API
Next, test the User Login by calling the /api/auth/login API. Select POST as request method and fill in required parameters (email and password) under form-data in request body. On successful call, this API will return a access token along with other details like token type, token expiration time, etc. Please refer the below screenshot:
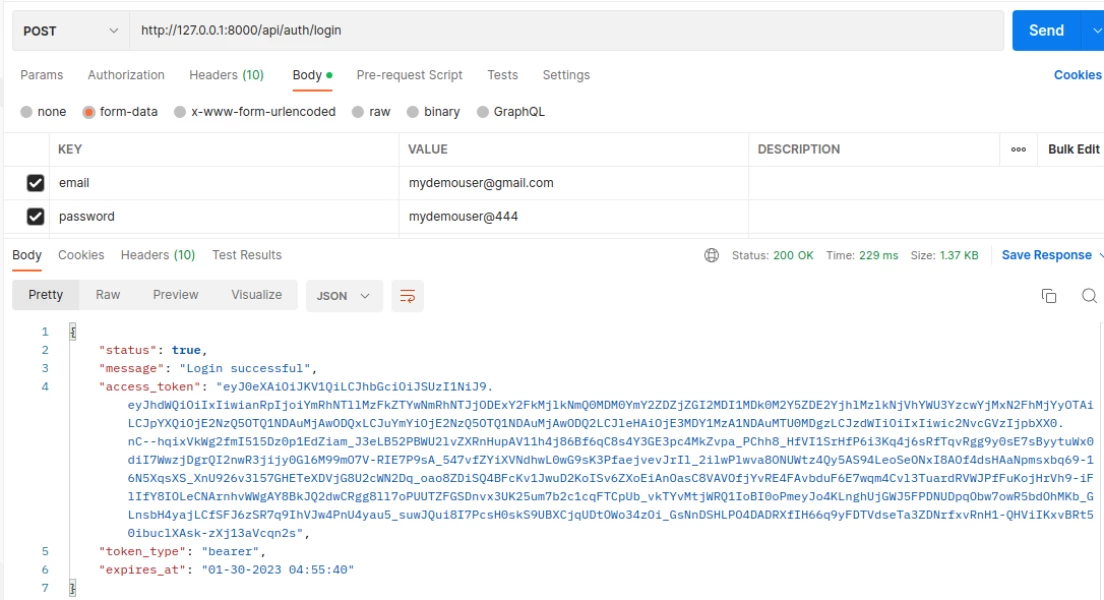
Once you have got the API Access Token, you can easily call continent CRUD REST APIs by providing the access token in request header as a field 'Authorization: Bearer Token'.
CRUD REST APIs on Continent Table
Once you have obtained API Access Token, let's perform CRUD REST API operation by passing the access token in request header as a field 'Authorization: Bearer Token'.
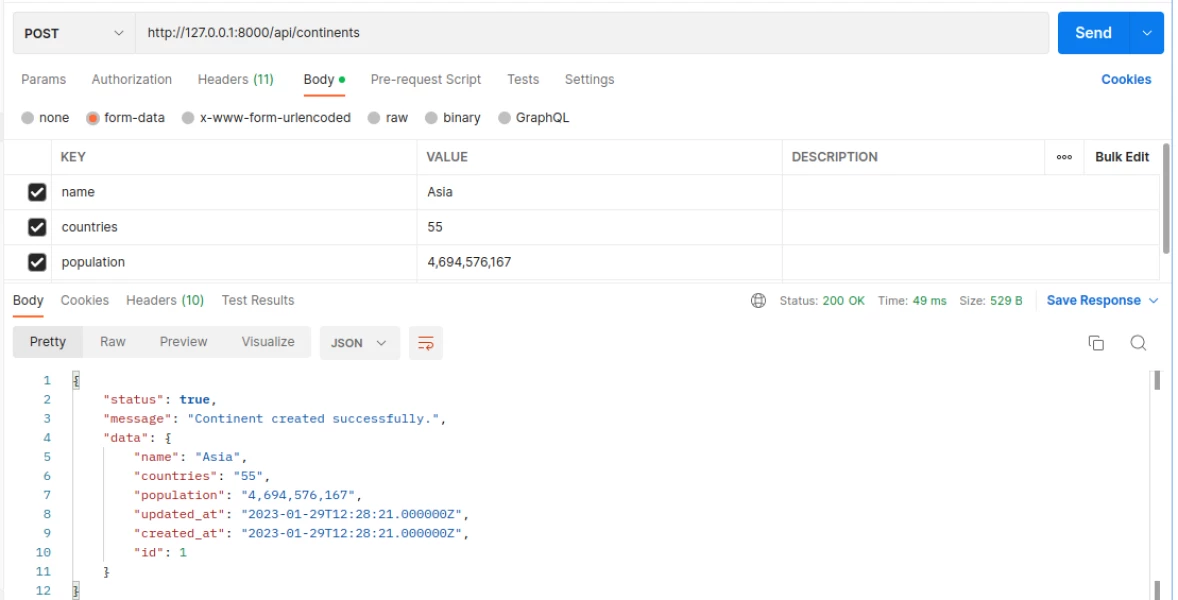
Continent Create API
Make http://127.0.0.1:8000/api/continents POST API request to create new continent. Please refer the below attached screenshot:
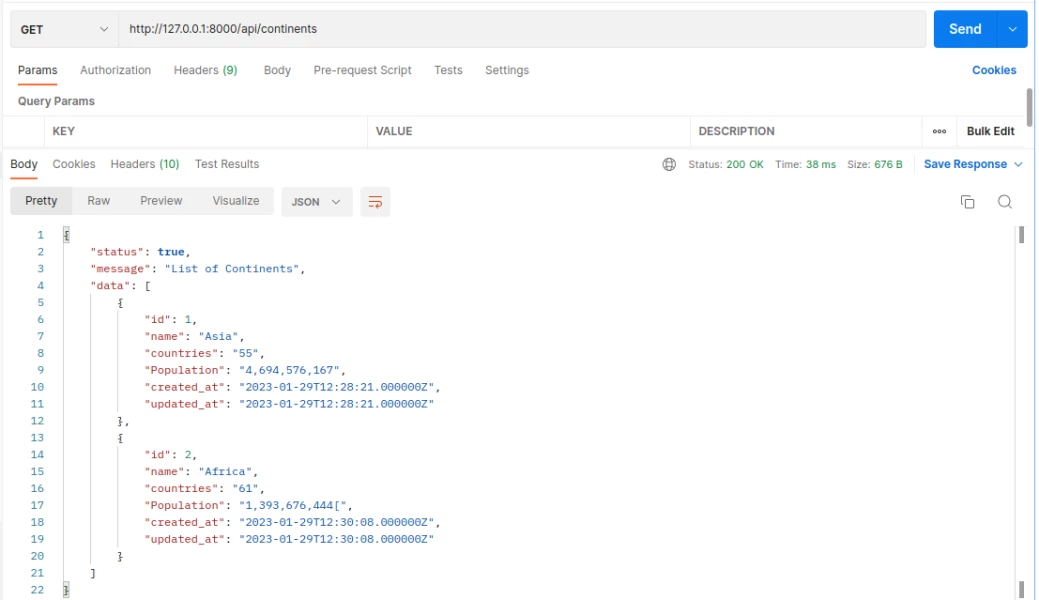
Continent List API
Next, get the continent list by making http://127.0.0.1:8000/api/continents GET API call. Please refer the below attached screenshot:
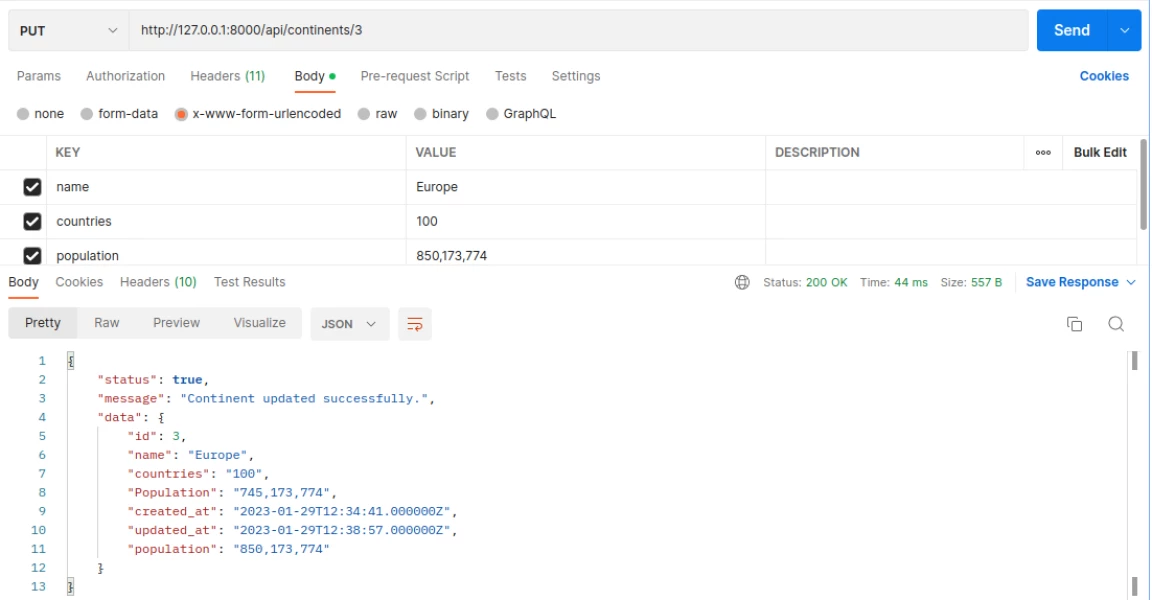
Continent Update API
Next, update a particular continent by calling http://127.0.0.1:8000/api/continents PUT API. Please refer the below screenshot:
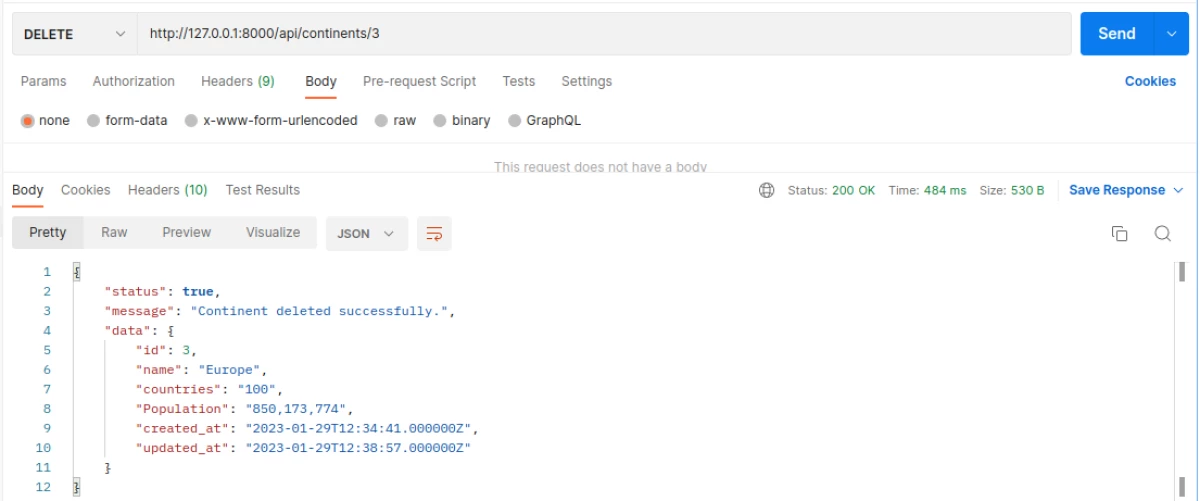
Continent Delete API
Next, delete a particular continent by making http://127.0.0.1:8000/api/continents DELETE API request. Please refer the below screenshot:
Recommended Posts
Simplified Laravel 9 REST API Tutorial using Sanctum Authentication
In this simplified tutorial, you will learn the simplest way to create a REST API application in Laravel 9 that will be authenticated using Laravel Sanctum.
Simplified Laravel 9 REST API Tutorial using JWT Authentication
In this comprehensive tutorial, you will easily learn step-by-step process of how to authenticate REST API application in Laravel 9 using JSON Web Token.

Laravel 10 CRUD Application Tutorial for Beginners
In this simple and comprehensive tutorial you are going to learn how to install Laravel 10 and create a New Laravel 10 CRUD Application.