Simplified Laravel 10 Image Upload Application Using Spatie Media Library
Last Updated: 28 Jan, 2024In this tutorial, I'll teach you How to Upload Images Using Spatie Media Library in Laravel 10 Application. In order to achieve this, you need to use spatie/laravel-medialibrary composer package. Follow the below mentioned steps.
What is Spatie Laravel Media Library?
Spatie Laravel Media Library is a very comprehensive package that can associate all sorts of files with Eloquent Models. It offers a very simple, fluent and easy to use API to work with Laravel.
How to Upload Images Using Spatie Media Library in Laravel 10 Application?
Now, we will go through the above given steps one-by-one to and get it done.
Step 1: Install Fresh Laravel 10 Application
First of all, let's install a fresh laravel 10 application. Open your terminal and run the below artisan command:
composer create-project laravel/laravel l10spatieimageupload
Step 2: Configure Database Connection
Next, let's update database configuration variables in .env file as follows:
DB_CONNECTION=mysql
DB_HOST=127.0.0.1
DB_PORT=3306
DB_DATABASE=l10spatieimageupload
DB_USERNAME=dbusername
DB_PASSWORD=dbpassword
Step 3: Install Spatie Media Library Package
Next, let's get the spatie/laravel-medialibrary composer package installed. Please execute the below artisan command in the terminal to do so:
composer require "spatie/laravel-medialibrary:^10.0.0"
Next, you need to publish the Spatie migrations to create the media table:
php artisan vendor:publish --provider="Spatie\MediaLibrary\MediaLibraryServiceProvider" --tag="migrations"
Next, run laravel migration
php artisan migrate
Step 4: Create Product Model & Migration
Next, lets create a model named Product and migration for it using below php artisan make:model command:
php artisan make:model Product -m
Above command will create a model file named app/Models/Product.php and a migration file named database/migrations/*_create_products_table.php.
Open the migration file and copy below code in it:
<?php

use Illuminate\Database\Migrations\Migration;
use Illuminate\Database\Schema\Blueprint;
use Illuminate\Support\Facades\Schema;

return new class extends Migration
{
    /**
     * Run the migrations.
     */
    public function up(): void
    {
        Schema::create('products', function (Blueprint $table) {
            $table->id();
            $table->string('name', 100);
            $table->timestamp('created_at')->useCurrent();
            $table->timestamp('updated_at')->useCurrent()->useCurrentOnUpdate();
        });
    }

    /**
     * Reverse the migrations.
     */
    public function down(): void
    {
        Schema::dropIfExists('products');
    }
};
Open the app/Models/Product.php file and copy the below given code onto it:
<?php
namespace App\Models;
use Illuminate\Database\Eloquent\Factories\HasFactory;
use Illuminate\Database\Eloquent\Model;
use Spatie\MediaLibrary\InteractsWithMedia;
use Spatie\MediaLibrary\HasMedia;

class Product extends Model implements HasMedia
{
    use HasFactory;
    use InteractsWithMedia;

    protected $fillable = [
        'name'
    ];
}
Also, keep in mind that we have import following service in app/Models/Product.php file and model must implement HasMedia:
use Spatie\MediaLibrary\InteractsWithMedia;
use Spatie\MediaLibrary\HasMedia;
Once you are done with model and migration files, let's run the below command that will run the laravel migration and create the tables in MySQL DB:
php artisan migrate
Step 5: Create ProductController
Next, let's create a controller called ProductController by using below command:
php artisan make:controller ProductController
Above command will create a controller file named app/Http/Controllers/ProductController.php. Open this file and copy below code in it:
<?php

namespace App\Http\Controllers;

use Illuminate\Http\Request;
use App\Models\Product;

class ProductController extends Controller
{
    public function index(Request $request)
    {
        $view_data = [];
        $records = Product::latest()->get();
        $view_data['records'] = $records;
        return view('products.index')->with($view_data);
    }

    public function create(Request $request)
    {
        $view_data = [];
        return view('products.create')->with($view_data);
    }

    public function store(Request $request)
    {
        $request_data = $request->all();
        $record = Product::create($request_data);
        if ($request->has('file') && $request->file('file')->isValid()) {
            $record->addMediaFromRequest('file')->toMediaCollection('files');
        }
        return redirect()->route('products');
    }
}
Step 6: Setup Product Routes
Next, open routes/web.php file and copy below code in it:
<?php
use Illuminate\Support\Facades\Route;

/*
|--------------------------------------------------------------------------
| Web Routes
|--------------------------------------------------------------------------
|
| Here is where you can register web routes for your application. These
| routes are loaded by the RouteServiceProvider within a group which
| contains the "web" middleware group. Now create something great!
|
*/

Route::get('/', function () {
    return view('welcome');
});
Route::group(['namespace'=> 'App\Http\Controllers', 'prefix'=>'products'], function(){
    Route::get('/', 'ProductController@index')->name('products');
    Route::get('/create', 'ProductController@create')->name('products.create');
    Route::post('/', 'ProductController@store')->name('products.save');
});
Step 7: Create Product Blade Files
In this step, lets create following blade files:
resources/views/products/master.blade.php
resources/views/products/index.blade.php
resources/views/products/create.blade.php
Open resources/views/products/master.blade.php and copy below code in it:
<!DOCTYPE html>
<html>
<head>
    <meta charset="utf-8">
    <meta name="viewport" content="width=device-width, initial-scale=1">
    <title>Laravel 10 Upload Images with Spatie Media Library</title>
    <meta name="csrf-token" content="{{ csrf_token() }}">
    <link href="https://cdn.jsdelivr.net/npm/bootstrap@5.1.3/dist/css/bootstrap.min.css" rel="stylesheet" crossorigin="anonymous">
</head>
<body>
    <div class="container bg-success">
        @yield('content')
    </div>
</body>
</html>
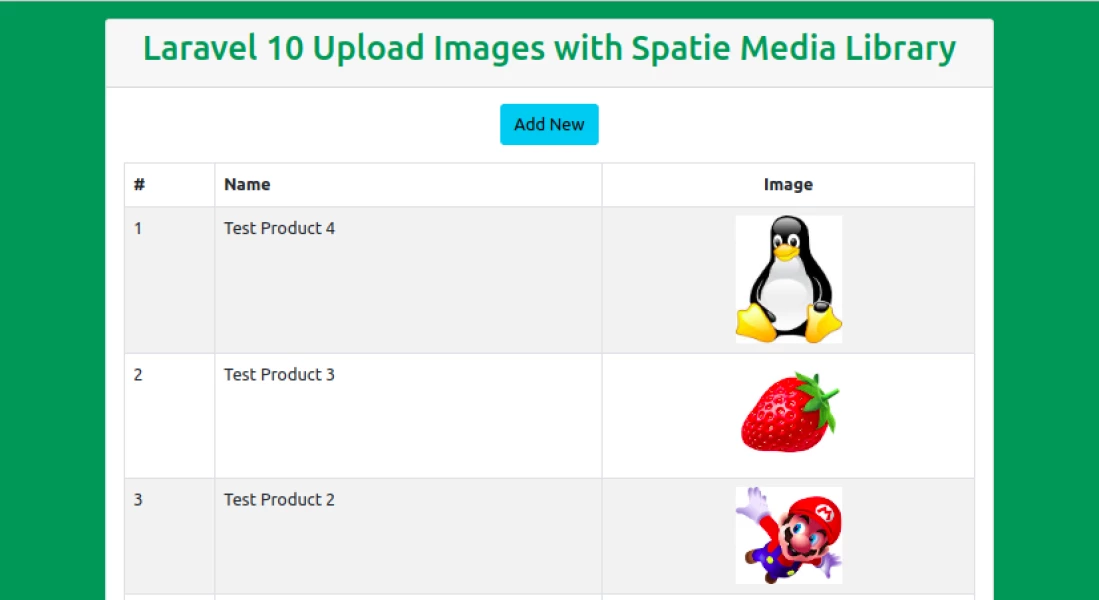
Open resources/views/products/index.blade.php and copy below code in it:
@extends('products.master')
@section('content')
<div class="row p-3">
    <div class="col-12 col-md-8 offset-md-2">
        <div class="card">
            <div class="card-header text-center text-success">
                <h2>Laravel 10 Upload Images with Spatie Media Library</h2>
            </div>
            <div class="card-body">
                <div class="row text-center">
                    <div class="col-12">
                        <a class="btn btn-info" href="{{route('products.create')}}">Add New</a>
                    </div>
                </div>
                <div class="row pt-3">
                    <div class="col-12">
                        <table class="table table-striped table-bordered">
                            <thead>
                                <tr>
                                    <th>#</th>
                                    <th>Name</th>
                                    <th class="text-center">Image</th>
                                </tr>
                            </thead>
                            <tbody>
                                @if($records->count() > 0)
                                @foreach($records as $rec)
                                <tr>
                                    <td>{{$loop->iteration}}</td>
                                    <td>{{$rec->name}}</td>
                                    <td class="text-center">
                                        <img src="{{$rec->getFirstMediaUrl('files', 'thumb')}}" width="100px">
                                    </td>
                                </tr>
                                @endforeach
                                @else
                                <tr><td colspan="3">Record not found!</td></tr>
                                @endif
                            </tbody>
                        </table>
                    </div>
                </div>
            </div>
        </div>
    </div>
</div>
@endsection
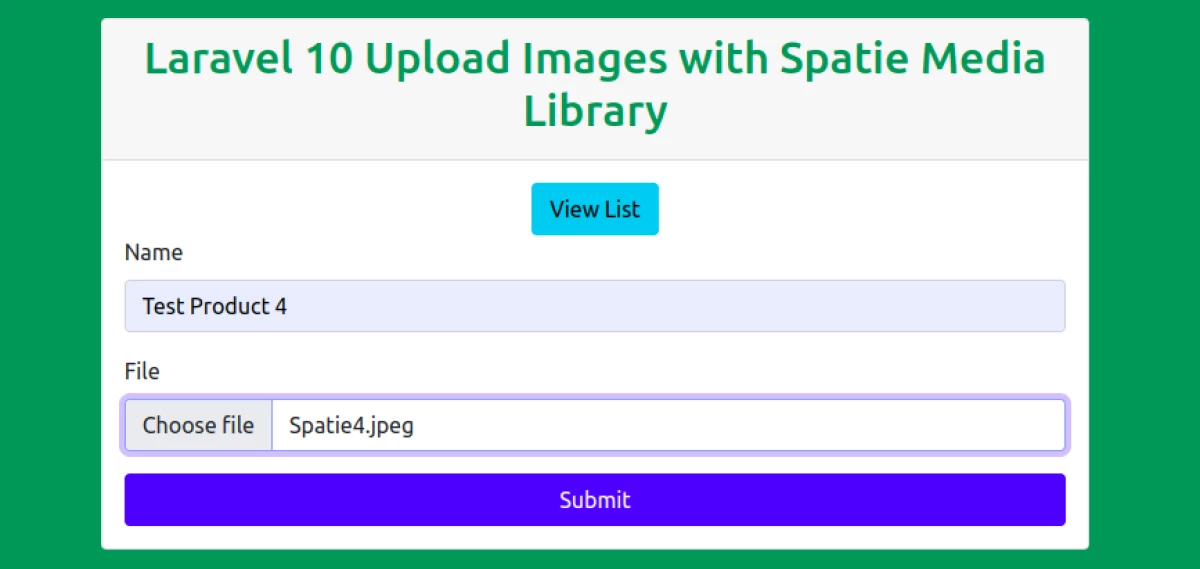
Open resources/views/products/create.blade.php and copy below code in it:
@extends('products.master')
@section('content')
<div class="row p-3">
    <div class="col-12 col-md-8 offset-md-2">
        <div class="card">
            <div class="card-header text-center text-success">
                <h2>Laravel 10 Upload Images with Spatie Media Library</h2>
            </div>
            <div class="card-body">
                <div class="row text-center">
                    <div class="col-12">
                        <a class="btn btn-info" href="{{route('products')}}">View List</a>
                    </div>
                </div>
                <div class="row">
                    <div class="col-12">
                        <form method="post" action="{{route('products.save')}}" enctype="multipart/form-data">
                            @csrf
                            <div class="mb-3">
                              <label for="name" class="form-label">Name</label>
                              <input type="text" class="form-control" id="name" name="name" placeholder="enter name" required>
                            </div>
                            <div class="mb-3">
                              <label for="file" class="form-label">File</label>
                              <input type="file" class="form-control" id="file" name="file" placeholder="select file">
                            </div>
                            <div class="d-grid">
                                <button class="btn btn-primary">Submit</button>
                            </div>
                        </form>
                    </div>
                </div>
            </div>
        </div>
    </div>
</div>
@endsection
Step 8: Setup APP_URL in Laravel .env file
Next, you need to update APP_URL variable in .env file as follows:
APP_URL=http://127.0.0.1:8000
Step 9: Link Laravel Storage
To create the symbolic link for storage/app/public folder, please use the below Artisan command:
php artisan storage:link
Step 10: Start Development Server and Test your Application
Now you will have to start the development server to test your application.
Run below command in terminal to start laravel development server:
php artisan serve
Finally, open below url in browser and test your application:
http://127.0.0.1:8000/products
OUTPUT
Recommended Posts

Laravel 10 CRUD Application Tutorial for Beginners
In this simple and comprehensive tutorial you are going to learn how to install Laravel 10 and create a New Laravel 10 CRUD Application.
How to Install and Configure Vue 3 Application in Laravel 10
This tutorial will show you How To Install and Configure a basic Vue 3 Application in Laravel 10 using Vite 3.
Laravel 10 Multiple Guards Authentication Application Tutorial
This tutorial will provide you a clear understanding of how can you setup a multiple authentication guards application in Laravel 10 with the help of examples.