Laravel 10 Social Media Share Buttons Integration Tutorial
Last Updated: 10 Feb, 2024In this tutorial, we will learn how to add different social share buttons in laravel 10 application using jorenvanhocht/laravel-share package. Social media are the best ways of sharing your posted content to your target audience.
How to Integrate Social Media Share Buttons in Laravel 10 Application?
Dear friends, follow the below given steps to integrate various social media share buttons in your laravel 10 app. Let's go through step-by-step and see how we can achieve our objective.
Step 1: Create Fresh Laravel 10 Application
First of all, let's open your terminal and install a fresh laravel 10 application by executing the following command:
composer create-project laravel/laravel l10socialsharebuttons
Step 2: Install orenvanhocht/laravel-share Composer Package
Next, install the laravel-share composer package using following command:
composer require jorenvanhocht/laravel-share
Step 3: Register ShareServiceProvider
Next, let's open config/app.php file and register ShareServiceProvider to it as follows:
<?php
return [
    ...
    ...
    ...
    'providers' => ServiceProvider::defaultProviders()->merge([
        /*
         * Package Service Providers...
         */
        Jorenvh\Share\Providers\ShareServiceProvider::class,

        /*
         * Application Service Providers...
         */
        App\Providers\AppServiceProvider::class,
        App\Providers\AuthServiceProvider::class,
        // App\Providers\BroadcastServiceProvider::class,
        App\Providers\EventServiceProvider::class,
        App\Providers\RouteServiceProvider::class,
    ])->toArray(),

    /*
    |--------------------------------------------------------------------------
    | Class Aliases
    |--------------------------------------------------------------------------
    |
    | This array of class aliases will be registered when this application
    | is started. However, feel free to register as many as you wish as
    | the aliases are "lazy" loaded so they don't hinder performance.
    |
    */

    'aliases' => Facade::defaultAliases()->merge([
        // 'Example' => App\Facades\Example::class,
        'Share' => Jorenvh\Share\ShareFacade::class,
    ])->toArray(),
];
Next, publish the package configuration and resource files by using below command:
php artisan vendor:publish --provider="Jorenvh\Share\Providers\ShareServiceProvider"
Step 4: Create SocialMediaShareButtonController
Next, create a controller app/Http/Controllers/SocialMediaShareButtonController.php and define function in it to add social media share button and load the view page to show the sharing buttons.
php artisan make:controller SocialMediaShareButtonController
Copy the below given code and paste into the app/Http/Controllers/SocialMediaShareButtonController.php file.
<?php

namespace App\Http\Controllers;

use Illuminate\Http\Request;

class SocialMediaShareButtonController extends Controller
{
    public function index()
    {
        $share_buttons = \Share::page(
            'https://www.laravelclick.com/post/laravel-10-social-media-share-buttons-integration-tutorial',
            'How to Add Social Media Share Button in Laravel 10 App?'
        )
        ->facebook()
        ->twitter()
        ->linkedin()
        ->whatsapp()
        ->telegram()
        ->reddit();

        $view_data['share_buttons'] = $share_buttons;

        return view('post')->with($view_data);
    }
}
Step 5: Add Route
Next, open routes/web.php and add below given code in it:
<?php

use Illuminate\Support\Facades\Route;
use App\Http\Controllers\SocialMediaShareButtonController;

/*
|--------------------------------------------------------------------------
| Web Routes
|--------------------------------------------------------------------------
|
| Here is where you can register web routes for your application. These
| routes are loaded by the RouteServiceProvider and all of them will
| be assigned to the "web" middleware group. Make something great!
|
*/

Route::get('/', function () {
    return view('welcome');
});
Route::get('/social-media-share-buttons', [SocialMediaShareButtonController::class, 'index']);
Step 6: Create View (Blade) File
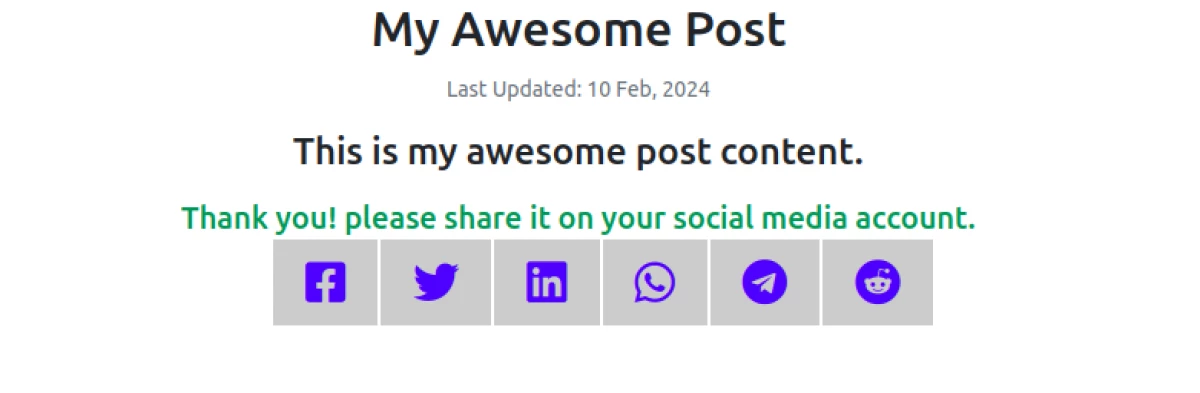
Next, create post.blade.php file inside resources/views directory. Inside this blade file, you need to import bootstrap and font-awesome file links and also add the {!! $share_buttons !!} variable to display the social media share buttons on your view page. Open the resources/views/post.blade.php and copy the below given code in it:
<!DOCTYPE html>
<html>
<head>
    <meta charset="utf-8">
    <meta name="viewport" content="width=device-width, initial-scale=1">
    <title>How to Integrate Social Media Share Buttons in Laravel 10</title>
    <link href="https://cdn.jsdelivr.net/npm/bootstrap@5.1.3/dist/css/bootstrap.min.css" rel="stylesheet" crossorigin="anonymous">
    <link rel="stylesheet" href="https://cdnjs.cloudflare.com/ajax/libs/font-awesome/5.15.3/css/all.min.css"/>
    <style>
        div#social-links {
            margin: 0 auto;
            max-width: 500px;
        }
        div#social-links ul li {
            display: inline-block;
        }
        div#social-links ul li a {
            padding: 10px 20px;
            border: 1px solid #ccc;
            margin: 1px;
            font-size: 30px;
            background-color: #ccc;
        }
    </style>
</head>
<body>
    <div class="container-fluid p-2 py-0 pb-3">
      <div class="row p-0 p-md-2 py-0 py-md-0">
        <div class="col-12 text-center">
            <div class="pb-3">
                <h3 class="mb-10 text-dark h2">My Awesome Post</h3>
                <small class="text-secondary">Last Updated: {{date('d M, Y')}}</small>
            </div>
            <div>
                <blockquote>
                    <strong class="h4">This is my awesome post content.</strong>
                </blockquote>
            </div>
            <div class="text-success text-center">
                <h5>Thank you! please share it on your social media account.</h5>
                <div>{!! $share_buttons !!}</div>
            </div>
        </div>
      </div>
    </div>
</body>
</html>
Step 7: Start Laravel Application
Next, start the laravel application development server using below command:
php artisan serve
Next, open below url in browser and see the result:
http://127.0.0.1:8000/social-media-share-buttons
Sample Output
Recommended Posts
Laravel 10 QR Code Generator Application Tutorial
A QR Code is a type of two-dimensional and machine-readable optical label that contains the information about the item to which it is attached.
Laravel 10 Barcode Generator Application Tutorial
A barcode or bar code is a square or rectangular image consisting of a series of parallel black lines and white spaces of varying widths.
Laravel 10 Livewire Image Upload Tutorial With Example
This tutorial will provide you step-by-step guidance How to Upload Image Using Livewire in Laravel 10 Application with example?