Laravel 10 Import CSV Data into MySQL Using Laravel Seeder
Last Updated: 10 Feb, 2024This tutorial will provide you step-by-step guidance about how to import CSV file records into MySQL by using laravel seeder. We will be using laravel seeder to grab data from csv file. But, before diving into the steps let's have a brief introduction of CSV file format and its usage.
What is CSV (comma-separated values) file?
A CSV (comma-separated values) file is simply a text file in which values are stored separated by comma. CSV file helps us to save data in a tabular form. In CSV file, each line is considered as a data record. There are multiple fields in each record, separated by comma.
What are the usage and advantages of CSV file?
- CSV file is very well-established text file format and recognized by many applications.
- CSV file is frequently used for spreadsheets.
- CSV file represents the data typically found in a database table.
- CSV file is a common format for data interchange because it is simple and compact.
- You can easily open a CSV file into Excel.
- Nearly all databases offer a tool to import data from CSV file.
- You can easily view and edit CSV file in any plain text editor.
How to Import Large Set of Records from CSV into MySQL using Laravel Seeder?
Now, we will go through all the steps one by one to achieve our objective.
Step 1: Create Fresh Laravel Application
Open terminal and install fresh laravel application using below command:
composer create-project laravel/laravel l10seedercsvimport
Next, lets get inside the csvimortapp using below command:
cd l10seedercsvimport
Step 2: Setup Database Configuration
Next, lets update database configuration in .env file as follows:
DB_CONNECTION=mysql
DB_HOST=127.0.0.1
DB_PORT=3306
DB_DATABASE=l10seedercsvimport
DB_USERNAME=dbusername
DB_PASSWORD=dbpassword
Step 3: Setup CSV File with Large Records
Next, let's create a csv file database/data/employees.csv. Open database/data/employees.csv file and addl following information in it:
Name, Email, Mobile, City, State, Country, PinCode, Salary
You can copy and paste below provided dummy data into database/data/employees.csv file:
name,email,mobile,city,state,country,pincode,salary
Employee_01,'emp01@gmail.com',9988776601,'Bangalore','Karnataka','India',560047,10000.00
Employee_02,'emp02@gmail.com',9988776601,'Bangalore','Karnataka','India',560047,10000.00
Employee_03,'emp03@gmail.com',9988776601,'Bangalore','Karnataka','India',560047,10000.00
Employee_04,'emp04@gmail.com',9988776601,'Bangalore','Karnataka','India',560047,10000.00
Employee_05,'emp05@gmail.com',9988776601,'Bangalore','Karnataka','India',560047,10000.00
Employee_06,'emp06@gmail.com',9988776601,'Bangalore','Karnataka','India',560047,10000.00
Employee_07,'emp07@gmail.com',9988776601,'Bangalore','Karnataka','India',560047,10000.00
Employee_08,'emp08@gmail.com',9988776601,'Bangalore','Karnataka','India',560047,10000.00
Employee_09,'emp09@gmail.com',9988776601,'Bangalore','Karnataka','India',560047,10000.00
Employee_10,'emp10@gmail.com',9988776601,'Bangalore','Karnataka','India',560047,10000.00
Employee_11,'emp11@gmail.com',9988776601,'Bangalore','Karnataka','India',560047,10000.00
Employee_12,'emp12@gmail.com',9988776601,'Bangalore','Karnataka','India',560047,10000.00
Employee_13,'emp13@gmail.com',9988776601,'Bangalore','Karnataka','India',560047,10000.00
Employee_14,'emp14@gmail.com',9988776601,'Bangalore','Karnataka','India',560047,10000.00
Employee_15,'emp15@gmail.com',9988776601,'Bangalore','Karnataka','India',560047,10000.00
Employee_16,'emp16@gmail.com',9988776601,'Bangalore','Karnataka','India',560047,10000.00
Employee_17,'emp17@gmail.com',9988776601,'Bangalore','Karnataka','India',560047,10000.00
Employee_18,'emp18@gmail.com',9988776601,'Bangalore','Karnataka','India',560047,10000.00
Employee_19,'emp19@gmail.com',9988776601,'Bangalore','Karnataka','India',560047,10000.00
Employee_20,'emp20@gmail.com',9988776601,'Bangalore','Karnataka','India',560047,10000.00
Step 4: Setup Model and Migration Files
Next, let's create a model app/Models/Employee.php along with migration files using below command:
php artisan make:model Employee -m
Above command will create App/Models/Employee.php model file and database/migrations/create_employees_table.php migration file.
Open the App/Models/Employee.php file and copy the below given code onto it:
<?php

namespace App\Models;

use Illuminate\Database\Eloquent\Factories\HasFactory;
use Illuminate\Database\Eloquent\Model;

class Employee extends Model
{
    use HasFactory;

    protected $fillable = [
        'name',
        'email',
        'mobile',
        'city',
        'state',
        'country',
        'pincode',
        'salary'
    ];
}
Open the database/migrations/create_employees_table.php file and copy the below given code onto it:
<?php

use Illuminate\Database\Migrations\Migration;
use Illuminate\Database\Schema\Blueprint;
use Illuminate\Support\Facades\Schema;

return new class extends Migration
{
    /**
     * Run the migrations.
     */
    public function up(): void
    {
        Schema::create('employees', function (Blueprint $table) {
            $table->id();
            $table->string('name');
            $table->string('email');
            $table->string('mobile');
            $table->string('city');
            $table->string('state');
            $table->string('country');
            $table->string('pincode');
            $table->string('salary');
            $table->timestamps();
        });
    }

    /**
     * Reverse the migrations.
     */
    public function down(): void
    {
        Schema::dropIfExists('employees');
    }
};
Step 5: Setup Laravel Seeder to Import Records
Next, we will be using laravel seeder to seed eployees table with a large csv file. Use below command to create EmployeeSeeder.php
php artisan make:seeder EmployeeSeeder
Open the database/seeders/EmployeeSeeder.php file and copy the below given code onto it:
<?php

namespace Database\Seeders;

use Illuminate\Database\Console\Seeds\WithoutModelEvents;
use Illuminate\Database\Seeder;
use App\Models\Employee;

class EmployeeSeeder extends Seeder
{
    /**
     * Run the database seeds.
     *
     * @return void
     */
    public function run()
    {
        Employee::truncate();
        $heading = true;
        $input_file = fopen(base_path("database/data/employees.csv"), "r");
        while (($record = fgetcsv($input_file, 1000, ",")) !== FALSE)
        {
            if (!$heading)
            {
                $employee = array(
                    "name" => $record['0'],
                    "email" => $record['1'],
                    "mobile" => $record['2'],
                    "city" => $record['3'],
                    "state" => $record['4'],
                    "country" => $record['5'],
                    "pincode" => $record['6'],
                    "salary" => $record['7']
                );
                Employee::create($employee);
            }
            $heading = false;
        }
        fclose($input_file);
    }
}
Step 6: Run EmployeeSeeder
Next, run the seeder by invoking below command:
php artisan db:seed --class=EmployeeSeeder
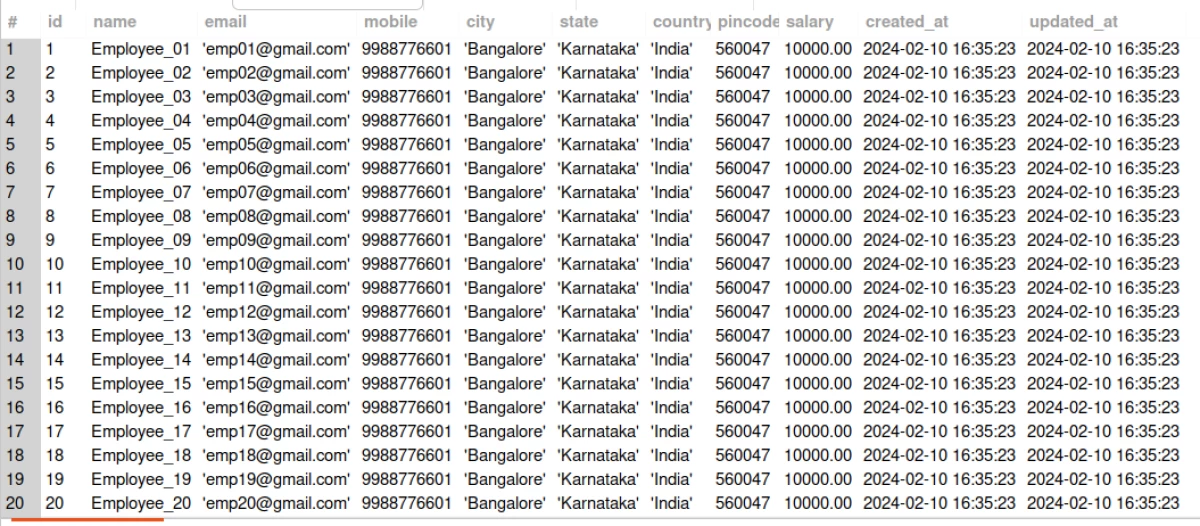
Above command will import all the data from employees.csv file to employees table.
Sample Imported Records Into Database
Recommended Posts
Laravel 10 Barcode Generator Application Tutorial
A barcode or bar code is a square or rectangular image consisting of a series of parallel black lines and white spaces of varying widths.
Laravel 10 Yajra Datatables Integration Tutorial
In this tutorial, you will learn How to Implement Yajra Datatables in Laravel 10 Application using yajra/laravel-datatables-oracle composer package.
Laravel 10 Social Media Share Buttons Integration Tutorial
This tutorial will provide you step-by-step guidance about How to Integrate Social Media Share Buttons in Laravel 10 Application.