Laravel 10 Barcode Generator Application Tutorial
Last Updated: 03 Feb, 2024What is Barcode?
A barcode or bar code is a medium of representing data in a visual form that can easily be read by machine. A barcode is a square or rectangular image consisting of a series of parallel black lines and white spaces of varying widths that can be read by a optical barcode scanner.
Some realtime examples of barcode usage:
- Barcodes are applied to products for quick identification.
- Barcodes are widely used in retail stores as part of the purchase process.
- Barcodes are used in warehouses to track inventory.
- Barcodes are used on invoices to assist in accounting.
Now, lets go through step by step and see how we can generate Barcode in Laravel 8.
Step 1: Create Fresh Laravel 10 Application
Open terminal and install fresh laravel application using below command:
composer create-project laravel/laravel l10barcodegenerator
Next, lets get inside the barcodeapp using below command:
cd barcodeapp
Step 2: Install Milon/Barcode Composer Package
Next, you need to install milon/barcode package for barcode generation. Type below command in terminal:
composer require milon/barcode "^10.0"
Next, let's open config/app.php file and add Barcode Service Provider and Aliases.
<?php
return [
    'providers' => ServiceProvider::defaultProviders()->merge([
        /*
         * Package Service Providers...
         */
        Milon\Barcode\BarcodeServiceProvider::class,

        /*
         * Application Service Providers...
         */
        App\Providers\AppServiceProvider::class,
        App\Providers\AuthServiceProvider::class,
        // App\Providers\BroadcastServiceProvider::class,
        App\Providers\EventServiceProvider::class,
        App\Providers\RouteServiceProvider::class,
    ])->toArray(),

    'aliases' => Facade::defaultAliases()->merge([
        // 'Example' => App\Facades\Example::class,
        'DNS1D' => Milon\Barcode\Facades\DNS1DFacade::class,
        'DNS2D' => Milon\Barcode\Facades\DNS2DFacade::class,
    ])->toArray(),
];
Step 3: Create Barcode Display Route
Next, we will create a route to test our application. Open routes/web.php file and put below code in it:
<?php

use Illuminate\Support\Facades\Route;
use App\Http\Controllers\BarcodeController;

/*
|--------------------------------------------------------------------------
| Web Routes
|--------------------------------------------------------------------------
|
| Here is where you can register web routes for your application. These
| routes are loaded by the RouteServiceProvider and all of them will
| be assigned to the "web" middleware group. Make something great!
|
*/

Route::get('/', function () {
    return view('welcome');
});
Route::get('/barcode', [BarCodeController::class, 'index']);
Step 4: Create Barcode Controller
Next, create app/Http/Controllers/BarcodeController.php file and put below code in it:
<?php

namespace App\Http\Controllers;

use Illuminate\Http\Request;

class BarcodeController extends Controller
{
    public function index()
    {
          return view('barcode');
    }
}
Step 5: Create Blade View File
Next, create resources/views/barcode.blade.php file and put below code in it:
<!DOCTYPE html>
<html>
<head>
<meta charset="utf-8">
<title>Generate Barcode in Laravel 10</title>
<meta name="csrf-token" content="{{ csrf_token() }}">
<link href="https://cdn.jsdelivr.net/npm/bootstrap@5.1.3/dist/css/bootstrap.min.css" rel="stylesheet" integrity="sha384-1BmE4kWBq78iYhFldvKuhfTAU6auU8tT94WrHftjDbrCEXSU1oBoqyl2QvZ6jIW3" crossorigin="anonymous">
</head>
<body>
<div class="container mt-3">
<div class="row">
<div class="col-12 text-success"><h2>Laravel Barcode Generator Application</h2></div>
</div>
<div class="row">
<div class="col-12 col-sm-6 col-md-4 mb-3">
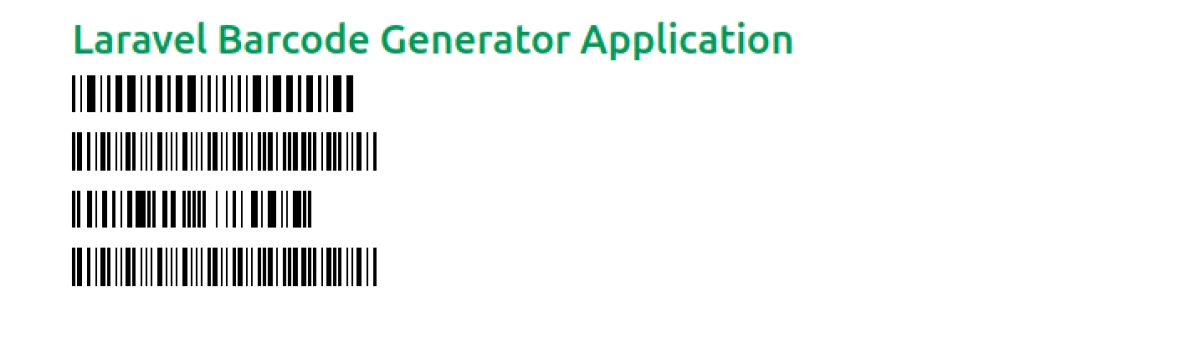
<div class="mb-3">{!! DNS1D::getBarcodeHTML('1234567890', 'PHARMA') !!}</div>
<div class="mb-3">{!! DNS1D::getBarcodeHTML('9988776655', 'CODABAR') !!}</div>
<div class="mb-3">{!! DNS1D::getBarcodeHTML('1234567890', 'UPCA') !!}</div>
<div class="mb-3">{!! DNS1D::getBarcodeHTML('9988776655', 'CODABAR') !!}</div>
</div>
</div>
</div>
</body>
</html>
Step 6: Start the development server using below command:
php artisan serve
Next, open below url in your browser to verify your application:
http://127.0.0.1:8000/barcode
APPLICATION OUTPUT
Recommended Posts
Laravel 10 QR Code Generator Application Tutorial
A QR Code is a type of two-dimensional and machine-readable optical label that contains the information about the item to which it is attached.
Laravel 10 Multiple Guards Authentication Application Tutorial
This tutorial will provide you a clear understanding of how can you setup a multiple authentication guards application in Laravel 10 with the help of examples.
Laravel 10 Import CSV Data into MySQL Using Laravel Seeder
In this tutorial you will easily understand how to import large set of data from CSV file into MySQL database using Laravel Seeder.